ImageTool Manager
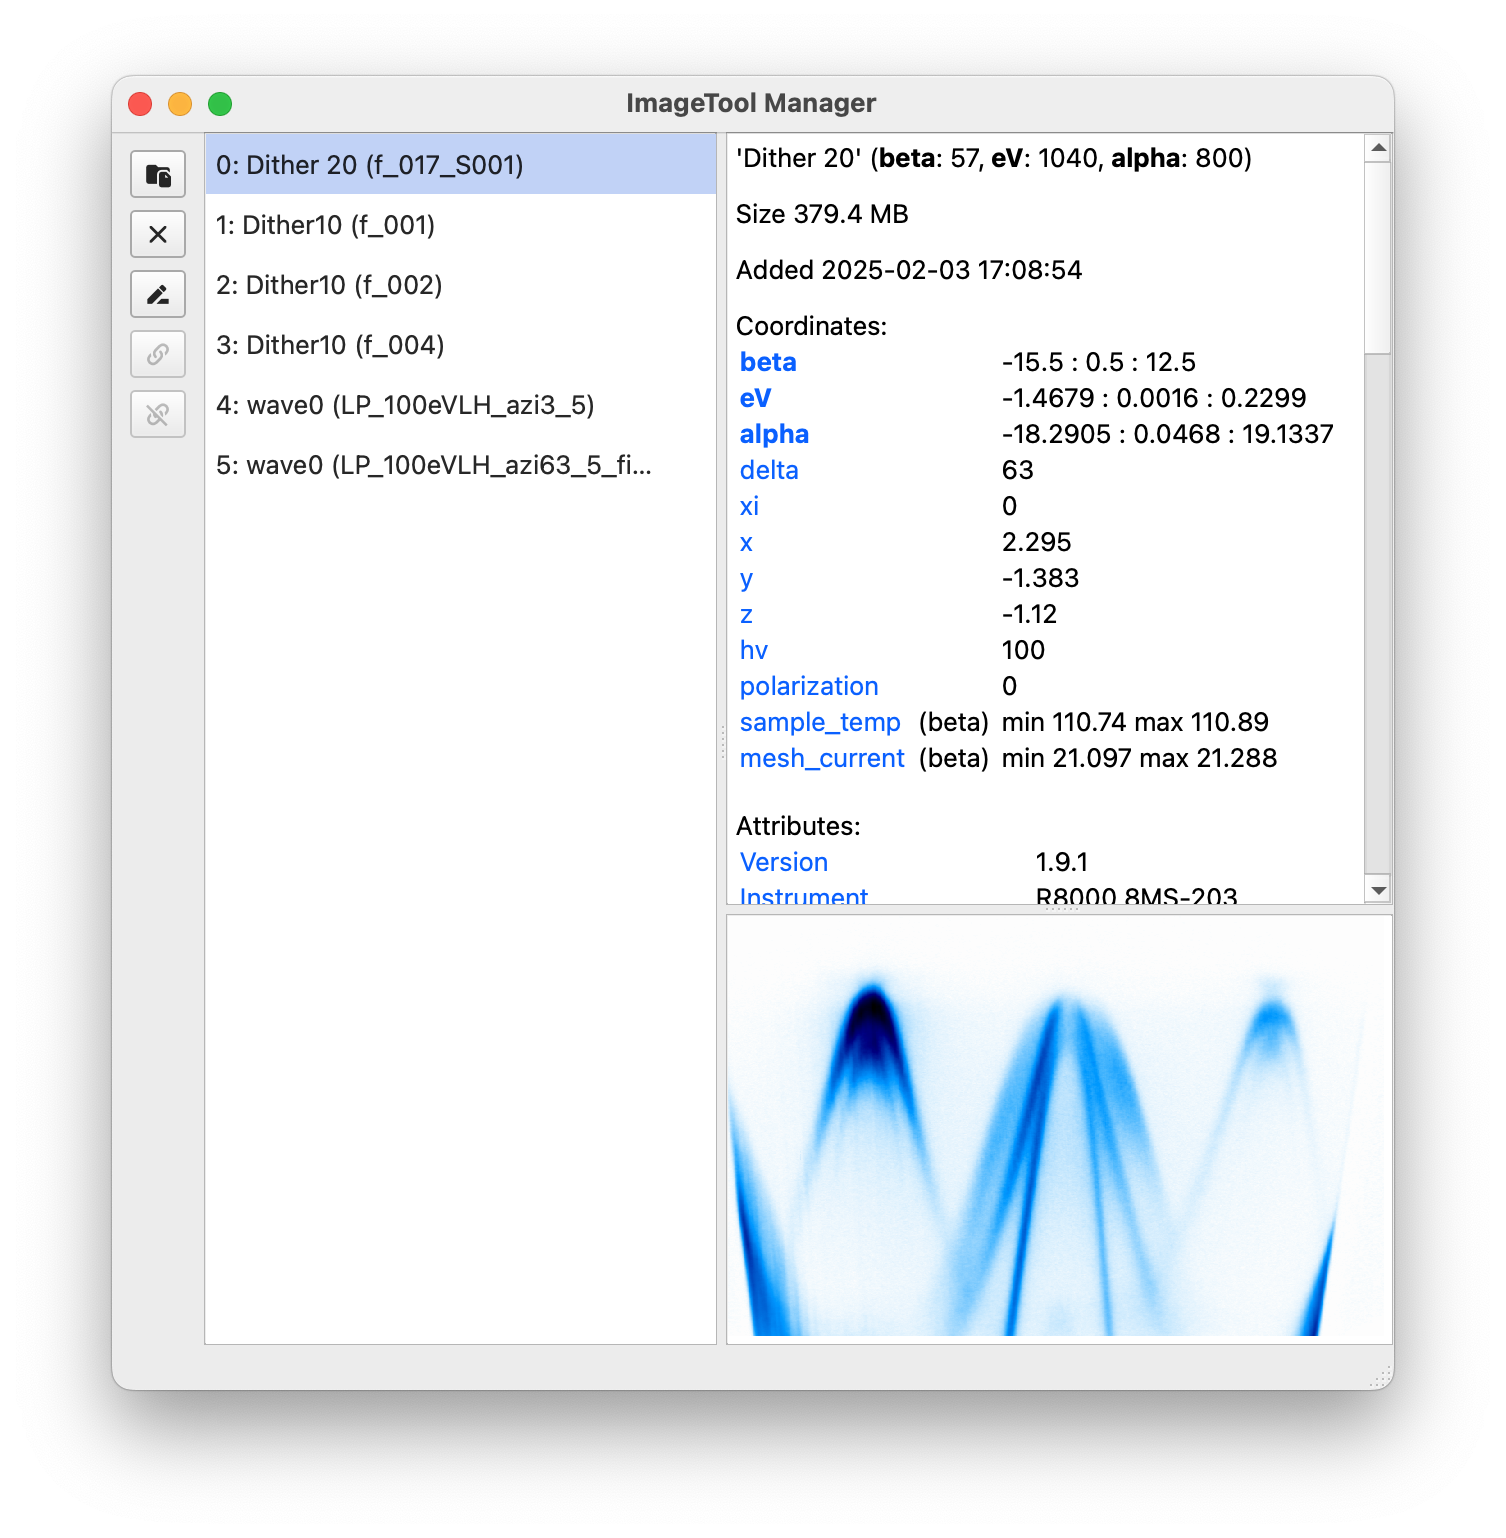
ImageToolManager is
the workspace for a full ImageTool analysis session. It keeps top-level ImageTool rows
(ImageTools that are not child rows), tools opened from those ImageTools, and ImageTool
windows opened from those tools in one tree. The manager also shows when a row created
by another row needs to be updated because the ImageTool or tool that created it
changed, and it can show code that repeats the selected steps in a notebook or script.
Why use the manager?
Launch and watch many ImageTool windows simultaneously without interrupting your notebook or script.
Keep top-level ImageTool rows, tools opened from them, and ImageTool windows made from those tools in a single tree.
Update tools and ImageTool windows when the ImageTool or tool that created them changes.
Link multiple ImageTools, duplicate them, or update their data in place in case of real-time data acquisition.
Save and reopen complete workspaces, including tools and ImageTool windows opened from other rows, colormaps, cursor positions, window geometry, and ROIs.
Archive rarely used windows to disk so they can be restored later without consuming RAM.
Synchronize directly with Jupyter via
%watch, access data from scripts usingfetch, copy code that repeats GUI steps, and perform quick analyses through a built-in IPython console.Drag-and-drop files to open them quickly, or use the integrated data explorer to browse preview data.
Results kept with the window that made them
The manager tree is not just a flat list of ImageTool windows. It can show the relationship between top-level ImageTool rows, the tools opened from those ImageTools, and the ImageTool windows those tools create.
Earlier versions always placed ImageTool windows at the top level. For example, if you opened an ImageTool window from another ImageTool, the new window appeared beside the one that made it. That made it hard to tell which window came from which data.
Now, when you are working in the manager, a new ImageTool window can appear as a child row under the tool or ImageTool that created it. A typical session looks like this:
Open data in the manager, or watch a notebook variable, so it appears as an ImageTool row.
Launch dtool, ktool, or another tool from that ImageTool.
Use Open in ImageTool from that tool.
The new ImageTool window appears under the tool or ImageTool that made it instead of as an unrelated top-level window.
That new ImageTool row remembers the selection or operation that made it. When the ImageTool or tool that created it changes, the manager can mark it as out of date, update it, and show the steps and code in the side panel.
Choosing where new data opens
ImageTool transform dialogs use Result Placement to decide what happens to the transformed data:
Open Child Window creates a new ImageTool row as a child of the current ImageTool. This is the default for ImageTool windows that are already in the manager.
Open Top-Level Window creates a separate top-level ImageTool. Choose this when you want the older detached-window behavior.
Replace Current overwrites the active ImageTool with the transformed data.
Outside the manager, transform dialogs still open normal standalone ImageTool windows. Inside the manager, prefer Open Child Window when the result should stay as part of the window that made it and be saved with the rest of the manager tree.
Updating rows when the window that made them changes
When data changes in an ImageTool or tool, the tools and ImageTool windows it created may no longer match it. The manager shows this with badges:
Stale means the ImageTool or tool that created this row changed, and this row can probably be updated.
Unavailable means the manager cannot repeat the saved selection or operation on the current data, such as when a dimension, coordinate, or selection has changed too much.
Auto means the row is up to date and automatic updates are enabled.
Click the badge in the tree, or the update banner inside the tool window, to review the update. The Automatic Updates dialog lets you apply a one-time update with Update Now, or turn automatic updates on or off and save that preference with Save. Saving only changes the automatic-update preference; it does not refresh a stale row.
When automatic updates are enabled and the row is up to date, the tree keeps showing the Auto badge so you can turn automatic updates off again. You can also right-click a child row and choose Automatic Updates….
Fitting tools can also take part in this flow. ftool, goldtool, and restool include Refit after update; when it is enabled, the tool reruns the same fit after compatible data from the ImageTool that opened it is updated.
Details and code for repeating steps
Selecting a row fills the side panel with details about that item. For an ImageTool window created from another row, the panel can show:
the file or data that started the workflow;
the steps used to create the selected ImageTool window;
code that can be pasted into a notebook or script to repeat those steps.
Use the steps list to copy exactly what you need. Select one or more steps and copy the selected code, or use Copy Full Code to copy the whole workflow from the data in the ImageTool that started the workflow to the selected ImageTool window. When the selected item came from a file, the details dialog can also copy the file path or a loading snippet when that information is available.
Round-trip
The manager is the live bridge between the GUI and notebook state. Enter from
data.qshow(manager=True), eri.itool(..., manager=True), or
erlab.interactive.imagetool.manager.show_in_manager(); synchronize with %watch or
erlab.interactive.imagetool.manager.watch(); and pull a safe copy back into Python
with fetch.
See Operation map for the maintained crosswalk.
Starting the manager
If you have a Python environment with ERLabPy installed:
Run
itool-managerin a terminal or command prompt window in the environment where ERLabPy is installed.You can also install the manager as an application on your operating system. See Installing as a standalone application for instructions.
Note
Only one manager can run per machine.
Opening an ImageTool window for the very first time after installing may take a couple of minutes as caches are built. Subsequent launches will be much faster.
Opening and replacing ImageTool windows
Once the manager is running, you can open ImageTools in several ways:
xarray.DataArray.qshow()orerlab.interactive.imagetool.itool()withmanager=Truesends windows directly to the manager:data.qshow(manager=True) eri.itool([d1, d2], manager=True, replace=[1, 2])
Pass
replace=to update data in existing windows instead of creating new ones.ImageTool’s %itool magic command with the
--manager(or-m) flag in an IPython session or Jupyter notebook.%itool -m darr
The File → Move to Manager (Ctrl+Shift+M) action from an ImageTool window opened outside the manager. This action moves the active ImageTool to the manager.
Use the manager’s File → Open File… action to load data in a new ImageTool.
Drag and drop supported ARPES data into the manager window.
In the dialog that appears, you can choose the plugin to use for loading the data. For plugin loaders, expand Loader Extensions to set literal
erlab.io.extend_loader()options.Hint
For scans that are recorded across multiple files, drag and dropping any file in the scan will automatically load and concatenate the entire scan. If you want to load only the file you dropped, choose the plugin suffixed with Single File in the dialog.
Launch the built-in data explorer from File → Data Explorer or Ctrl+E when you want directory browsing and metadata preview before opening selected files in the manager. Use the loader options button next to the loader selector to apply the same
loader_extensions=settings when opening selected files.Watch notebook variables with the
%watchmagic to create windows that stay synchronized with your data structures. See Notebook integration.For custom integration with other workflows, scripts can call
erlab.interactive.imagetool.manager.show_in_manager()orload_in_manager()directly (see Automation APIs).
When you open multiple DataArrays at once, the manager adds each window to the list without automatically showing them. To bring a window to the front, double-click its entry or select it and press Show.
Workspaces
Choose File → Save Workspace As… to save multiple open windows to a single .itws file. Workspaces store not only the data, but also the ImageTool settings such as cursor locations, colormaps, window geometry, and ROIs.
When supported, workspaces also store tools opened from ImageTool rows, ImageTool windows opened from tools or other ImageTools, fit results, the information needed to update rows after data changes, and the steps shown in the side panel. This lets a reopened workspace keep the same tree instead of moving those windows to unrelated top-level entries.
Saved ImageTool workspaces can be reloaded via File → Open Workspace… or by dragging the .itws file back into the manager to recreate your windows exactly as they were. Share the file with collaborators and they will see the identical layout.
Note
Older workspace files still load. Workspaces saved with tools and ImageTool windows opened from other rows need this release or later to preserve the full tree and update status.
Data Explorer and Console
In addition to ImageTool windows and analysis tools opened from them, the manager can also launch standalone apps that stay outside the tree view and workspace files.
Data Explorer
Open the explorer from File → Data Explorer or Ctrl+E.
Use it when you want to browse folders, preview metadata, queue batch loads, and then
open selected files into the manager without writing code. For most day-to-day browsing
it is faster than the interactive summary table in the I/O guide. Use
erlab.io.summarize() instead when you want the overview as a DataFrame in Python
or when you are developing loaders.
The explorer can also be launched standalone from Python or the command line for browsing and previewing. Opening selected files into ImageTool analysis still requires a running ImageTool manager, which is why launching it from the manager is the recommended path.
For the standalone tool page, see Data explorer.
Periodic Table
Open the periodic table from Apps → Periodic Table or Ctrl+Shift+P.
Use it when you want quick reference for core-level energies photoionization cross sections.
For the standalone tool page, see Periodic table.
Console
Toggle the embedded IPython console with Ctrl+J or via the View
menu. The console exposes a tools list containing wrappers for every ImageTool. For
example:
# List names of all windows
[tool.name for tool in tools]

# Access the underlying DataArray of the first window
tools[0].data

# Replace data in the first window
tools[0].data = new_data
Run standard Python, %magic commands, or inspect objects with ? exactly as you would
in a notebook.
Notebook integration
The manager keeps notebooks synchronized through the %watch magic and provides
functions for retrieving and storing data.
Tip
If you are using VS Code (or other editor that supports VS Code extensions), the dedicated erlab extension ( marketplace | open-vsx ) adds convenient commands for working with the manager directly from notebooks. Search for erlab in the extensions panel of your editor to install it.
Watching notebook variables
Load the IPython extension and start watching variables:
%load_ext erlab.interactive
%watch my_data
Note
To load the extension automatically, add erlab.interactive to your IPython configuration, or configure VS Code’s Jupyter extension with
"jupyter.runStartupCommands": [
    "%load_ext erlab.interactive"
]
so %watch is always available.
Watching creates a labeled ImageTool window. Any time my_data changes in the notebook, the manager updates the matching window. Editing inside ImageTool—rotation, symmetrization, cropping, or other ImageTool operations—writes the results back to the notebook variable.
Note
To keep comparisons fast, only small subsets of large arrays are compared to check whether data has been modified. If a change slips by, re-run %watch my_data to force a refresh.
Controlling watches:
%watch data1 data2 data3   # add multiple variables
%watch                     # list watched names
%watch -d data1 data2      # stop watching specific variables
%watch -x data1            # stop watching and close the window
%watch -z                  # stop watching everything
%watch -xz                 # stop watching and close every watched window
You can also right-click a tool in the manager and choose Stop Watching.
If a variable is deleted or replaced with a non-DataArray, the manager automatically breaks the link and keeps the window as a regular ImageTool.
Note
When a notebook kernel shuts down, watched windows remain open in the manager but no longer synchronize. Use Stop Watching or run %watch -z before closing the kernel to avoid confusion. Variables watched from different notebooks are color-coded for clarity.
Outside IPython (e.g., marimo notebooks)
If %watch is not available, use the Python API directly:
from erlab.interactive.imagetool.manager import watch

# Start watching a DataArray
watch("my_data")

# Stop watching one variable
watch("my_data", stop=True)

# Stop watching everything
watch(stop_all=True)
In non-IPython environments, watcher updates falls back to polling, which periodically checks for changes in the watched variables. You can adjust the frequency with poll_interval_s if needed:
watch("my_data", poll_interval_s=0.5)
Alternately, you can force an immediate check for changes with maybe_push instead of waiting for the next poll.
Use shutdown to stop threads cleanly.
Note
watch can infer a namespace automatically, but providing an explicit namespace= argument is safer when you call it indirectly (for example, from small utility functions, callbacks, or wrappers) where the caller scope may not be obvious. In those cases, pass the exact mapping you want to watch, like namespace=globals().
Accessing manager data programmatically
Use fetch inside a notebook or script to copy data out of the manager:
from erlab.interactive.imagetool.manager import fetch

data = fetch(0)  # returns an xarray.DataArray copy
Because fetch returns a copy, you can safely modify it without touching the live window.
Editor integration
If you are using VS Code (or other editor that supports VS Code extensions), the dedicated erlab extension ( marketplace | open-vsx ) adds convenient features for working with the manager directly from notebooks. Search for erlab in the extensions panel of your editor to install it.
Automation APIs
If you wish to integrate the manager into custom workflows, you can programmatically load data and control ImageTool windows in the manager. Use the public functions exported from erlab.interactive.imagetool.manager:
from erlab.interactive.imagetool.manager import load_in_manager, show_in_manager

# Open raw files and let the manager choose the loader interactively
load_in_manager(["scan1.pxt", "scan2.pxt"])

# Open raw files with temporary loader extensions
load_in_manager(
    ["scan1.pxt", "scan2.pxt"],
    "merlin",
    loader_extensions={"coordinate_attrs": ("scan_number",)},
)

# Open two ImageTools and link their cursors
show_in_manager([data_a, data_b], link=True)

# Replace the dataset at index 3 with a new result
show_in_manager(new_data, replace=3)
Additional functions such as replace_data and watch give you finer control when building custom acquisition pipelines.
Under the hood these functions communicate with the GUI via ZeroMQ, so they can be called from any Python process that can reach the manager (even on a different machine). See the API docs for details.
Installing as a standalone application
Standalone bundles for Windows and macOS let you run the manager without managing a Python environment. They add OS-level conveniences such as opening supported files by double-clicking them (or, on macOS, dropping files onto the Dock icon). For macOS 26 and later, the app also features a dynamic icon that matches the new design language.
Download the latest release from the project’s releases page, then follow the platform-specific steps below. For other platforms, or if you prefer full control, build from source via Build from source.
Windows
Download the latest Windows build
.zipfile from the releases page.Extract it and double-click the included
.exeinstaller, then follow the prompts.
macOS
Download the latest
.ziparchive that matches your architecture from the releases page.Extract it to obtain
ImageTool Manager.app.Move the app into
/Applications(or any folder you prefer) and launch it like any other macOS application.
Updating the application
Updates can be checked and installed from within the application itself. Select Check for Updates… in the menu bar under Help (Windows) or ImageTool Manager next to (macOS) and follow the prompts.
Build from source
If you want to build the standalone application from source due to platform compatibility or other reasons, follow these steps:
Clone the repository:
git clone https://github.com/kmnhan/erlabpy.git
cd erlabpy
Install dependencies (requires
uv):uv sync --all-extras --group pyinstaller --group pyqt6
Build the application:
uv run pyinstaller manager.spec
The resulting app will be in
dist/ImageTool Manager.(Optional, Windows only) Install Inno Setup and add to your system PATH. Then run
iscc manager.issto create an installer file.